Markers
Markers are visual indicators that can be applied to columns and appointments on the scheduling grid. The markers can be used as follows.
- On appointments to signify that the patient has achieved some threshold (stage, goal, or level) in treatment, that they are experiencing some type of problem (an allergy, for example), or that they need to see some type of resource (a PT, for example).
- On patient columns in a manner similar to appointments: e.g., as an alert for allergies, level of treatment, etc.
- On resource columns to designate a member of a team, to indicate the resource is of a given type, etc.
You may apply up to seven markers to an appointment or a column as needed. The significance of the markers is determined by your organization's workflow. Some features of the markers can be configured including the marker colors, the number of markers that can be used (up to a maximum of seven), the tool tip that displays when you hover your mouse pointer over a marker on the grid, and whether to allow multiple markers of the same color on columns or appointments. See the Marker Settings help topic for more configuration information.
Applying Markers to an Appointment
- Select Scheduling > Grid from the Main menu to navigate to the scheduling grid.
- Locate the appointment to which you want to apply a marker (if necessary place the appropriate resource into a column and navigate to the appropriate day).
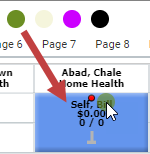
- Click-and-Drag (click the marker and hold the mouse down while dragging) the desired marker to any point on a patient's appointment.
- Repeat as necessary to apply other relevant markers.
The Markers appear between the Main menu and the page tabs, as illustrated in the following screen shot.


Release the mouse. The grid will refresh and the marker will appear centered along the top of the first cell of the appointment.

The markers on the appointment display in the same order as they appear above the page tabs. Using our example and applying all of the markers, the order would be Purple-Orange-Green-Pink.
Removing Markers From an Appointment
- Repeat steps 1–2 above.
- Once the appointment has been located, right-click the appointment to display the Scheduling Palette.
The markers appear as follows.

- Click a marker icon to remove the marker from the appointment.
- Repeat as necessary to remove other markers from the appointment.
Applying Markers to a Column Header
- Select Scheduling > Grid from the Main menu to navigate to the scheduling grid.
- Locate the resource or patient column to which you want to apply a marker. If necessary place the appropriate resource or patient into a column.
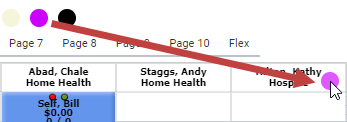
- Click-and-drag one of the markers to the column header and release the mouse, as illustrated in the following example.
- Repeat as necessary to apply additional markers to the column header.

The results of dropping the marker look similar to the following example.

Removing Markers From a Column Header
- Repeat steps 1–2 above.
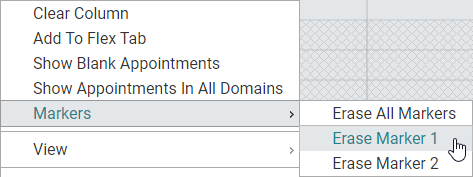
- Once the resource or patient column has been located, right-click the column header then select Markers > Erase Marker 1 to remove the marker. If more than one marker is applied to the column, you will have the option to Erase All Markers, Erase Marker 1, Erase Marker 2, etc.

- Repeat as necessary to remove other markers from the column header.
Key Considerations
- The ability to assign or remove appointment markers is controlled by the Security Right Appointment Operations > Change Appointment Status.
- The ability to assign or remove column markers is controlled by the Security Right Grid Features > Apply/Erase Markers on Columns.
- Markers can be applied to patient appointments, blocks, and holds. They are not available for group appointments or template block and hold times.
- Markers appear in the Daily, Weekly, Monthly, and Patient views.
- Once a resource column is marked, then the resource-domain combination is marked for all users. Anyone who places the same resource-domain combination into a column will see the marker.
- Once a patient column is marked, it is marked for all users who place the patient into a column.
- Column markers do not effect (or translate to) appointments.
- If the appointment is part of a series, a message similar to the following will appear when you apply or remove a marker. Click Apply to Series to apply the change to appointments from the point of change forward. Click Don't Apply to Seriesto affect only the selected appointment. Click Cancel to abort the application of the marker. Past appointments are not affected.
- WellSky Resource Manager does not capture or associate the significance of the markers, so it is important that users clearly understand the markers' intended use and how to integrate them into the scheduling workflow.
- If you link two or more appointments with different markers enabled, each marker will append to the other segment so that each segment displays the same set of markers. Consider the before and after examples in the following screen shot. Both segments have a green marker and an orange marker after linking the appointments. (The appointment color comes from a setting that was selected when the appointments were linked.)


